Kubernetes is becoming the standard for development, while the entry barrier remains quite high. We’ve compiled a list of recommendations for application developers who are migrating their apps to the orchestrator. Knowing the listed points will help you avoid potential problems and not create limitations where Kubernetes has advantages. Kubernetes Migration.
Who is this text for?
It’s for developers who don’t have DevOps expertise in their team – no full-time specialists. They want to move to Kubernetes because the future belongs to microservices, and Kubernetes is the best solution for container orchestration and accelerating development through code delivery automation to environments. At the same time, they may have locally run something in Docker but haven’t developed anything for Kubernetes yet.
Such a team can outsource Kubernetes support – hire a contractor company, an individual specialist, or, for example, use the relevant services of an IT infrastructure provider. For instance, Gart Solutions offers DevOps as a Service – a service where the company’s experienced DevOps specialists will take on any infrastructure project under full or partial supervision: they’ll move your applications to Kubernetes, implement DevOps practices, and accelerate your time-to-market.
Regardless, there are nuances that developers should be aware of at the architecture planning and development stage – before the project falls into the hands of DevOps specialists (and they force you to modify the code to work in the cluster). We highlight these nuances in the text.
The text will be useful for those who are writing code from scratch and planning to run it in Kubernetes, as well as for those who already have a ready application that needs to be migrated to Kubernetes. In the latter case, you can go through the list and understand where you should check if your code meets the orchestrator’s requirements.
The Basics
At the start, make sure you’re familiar with the “golden” standard The Twelve-Factor App. This is a public guide describing the architectural principles of modern web applications. Most likely, you’re already applying some of the points. Check how well your application adheres to these development standards.
The Twelve-Factor App
- Codebase: One codebase, tracked in a version control system, serves all deployments.
- Dependencies: Explicitly declare and isolate dependencies.
- Configuration: Store configuration in the environment – don’t embed in code.
- Backing Services: Treat backing services as attached resources.
- Build, Release, Run: Strictly separate the build, release, and run stages.
- Processes: Run the application as one or more stateless processes.
- Port Binding: Expose services through port binding.
- Concurrency: Scale the application by adding processes.
- Disposability: Maximize reliability with fast startup and graceful shutdown.
- Dev/Prod Parity: Keep development, staging, and production environments as similar as possible.
- Logs: Treat logs as event streams.
- Admin Processes: Run administrative tasks as one-off processes.
Now let’s move on to the highlighted recommendations and nuances.
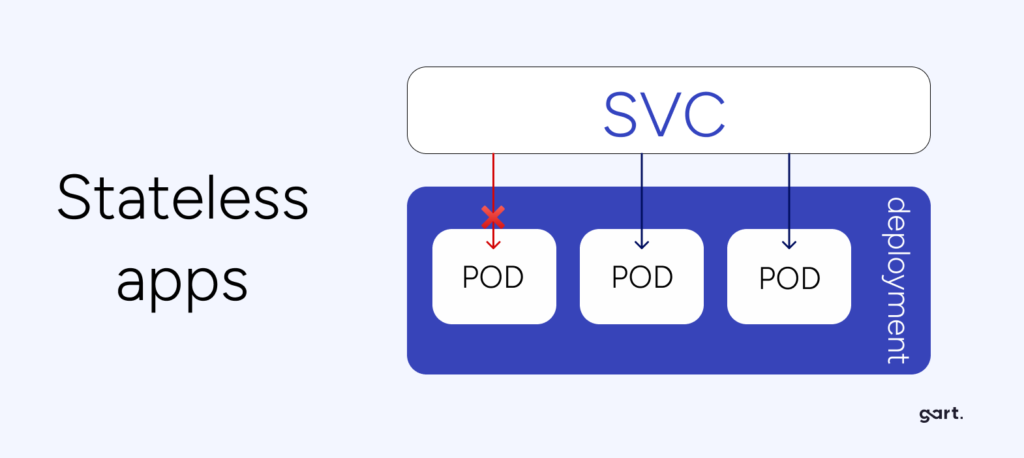
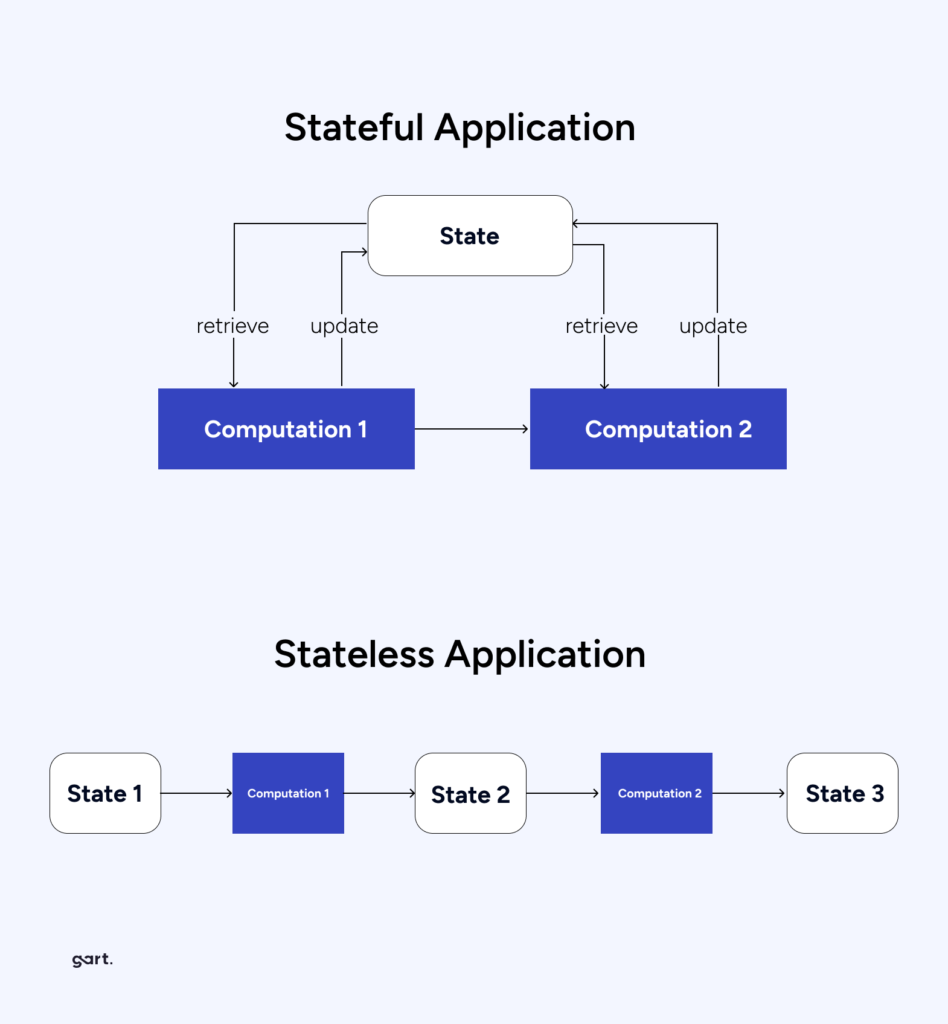
Prefer Stateless Applications
Why?
Implementing fault tolerance for stateful applications will require significantly more effort and expertise.
Normal behavior for Kubernetes is to shut down and restart nodes. This happens during auto-healing when a node stops responding and is recreated, or during auto-scaling down (e.g., some nodes are no longer loaded, and the orchestrator excludes them to save resources).
Since nodes and pods in Kubernetes can be dynamically removed and recreated, the application should be ready for this. It should not write any data that needs to be preserved to the container it is running in.
What to do?
You need to organize the application so that data is written to databases, files to S3 storage, and, say, cache to Redis or Memcache. By having the application store data “on the side,” we significantly facilitate cluster scaling under load when additional nodes need to be added, and replication.
In a stateful application where data is stored in an attached Volume (roughly speaking, in a folder next to the application), everything becomes more complicated. When scaling a stateful application, you’ll have to order “volumes,” ensure they’re properly attached and created in the right zone. And what do you do with this “volume” when a replica needs to be removed?
Yes, some business applications should be run as stateful. However, in this case, they need to be made more manageable in Kubernetes. You need an Operator, specific agents inside performing the necessary actions… A prime example here is the postgres-operator. All of this is far more labor-intensive than simply throwing the code into a container, specifying five replicas, and watching it all work without additional dancing.
Ensure Availability of Endpoints for Application Health Checks
Why?
We’ve already noted that Kubernetes itself ensures the application is maintained in the desired state. This includes checking the application’s operation, restarting faulty pods, disabling load, restarting on less loaded nodes, terminating pods exceeding the set resource consumption limits.
For the cluster to correctly monitor the application’s state, you should ensure the availability of endpoints for health checks, the so-called liveness and readiness probes. These are important Kubernetes mechanisms that essentially poke the container with a stick – check the application’s viability (whether it’s working properly).
What to do?
The liveness probes mechanism helps determine when it’s time to restart the container so the application doesn’t get stuck and continues to work.
Readiness probes are not so radical: they allow Kubernetes to understand when the container is ready to accept traffic. In case of an unsuccessful check, the pod will simply be excluded from load balancing – no new requests will reach it, but no forced termination will occur.
You can use this capability to allow the application to “digest” the incoming stream of requests without pod failure. Once a few readiness checks pass successfully, the replica pod will return to load balancing and start receiving requests again. From the nginx-ingress side, this looks like excluding the replica’s address from the upstream.
Such checks are a useful Kubernetes feature, but if liveness probes are configured incorrectly, they can harm the application’s operation. For example, if you try to deploy an application update that fails the liveness/readiness checks, it will roll back in the pipeline or lead to performance degradation (in case of correct pod configuration). There are also known cases of cascading pod restarts, when Kubernetes “collapses” one pod after another due to liveness probe failures.
You can disable checks as a feature, and you should do so if you don’t fully understand their specifics and implications. Otherwise, it’s important to specify the necessary endpoints and inform DevOps about them.
If you have an HTTP endpoint that can be an exhaustive indicator, you can configure both liveness and readiness probes to work with it. By using the same endpoint, make sure your pod will be restarted if this endpoint cannot return a correct response.
Aim for More Predictable and Uniform Application Resource Consumption
Why?
Almost always, containers inside Kubernetes pods are resource-limited within certain (sometimes quite small) values. Scaling in the cluster happens horizontally by increasing the number of replicas, not the size of a single replica. In Kubernetes, we deal with memory limits and CPU limits. Mistakes in CPU limits can lead to throttling, exhausting the available CPU time allotted to the container. And if we promise more memory than is available, as the load increases and hits the ceiling, Kubernetes will start evicting the lowest priority pods from the node. Of course, limits are configurable. You can always find a value at which Kubernetes won’t “kill” pods due to memory constraints, but nevertheless, more predictable resource consumption by the application is a best practice. The more uniform the application’s consumption, the tighter you can schedule the load.
What to do
Evaluate your application: estimate approximately how many requests it processes, how much memory it occupies. How many pods need to be run for the load to be evenly distributed among them? A situation where one pod consistently consumes more than the others is unfavorable for the user. Such a pod will be constantly restarted by Kubernetes, jeopardizing the application’s fault-tolerant operation. Expanding resource limits for potential peak loads is also not an option. In that case, resources will remain idle whenever there is no load, wasting money. In parallel with setting limits, it’s important to monitor pod metrics. This could be kube-Prometheus-Stack, VictoriaMetrics, or at least Metrics Server (more suitable for very basic scaling; in its console, you can view stats from kubelet—how much pods are consuming). Monitoring will help identify problem areas in production and reconsider the resource distribution logic.
There is a rather specific nuance regarding CPU time that Kubernetes application developers should keep in mind to avoid deployment issues and having to rewrite code to meet SRE requirements. Let’s say a container is allocated 500 milli-CPUs—roughly 0.5 CPU time of a single core over 100 ms of real time. Simplified, if the application utilizes CPU time in several continuous threads (let’s say four) and “eats up” all 500 milli-CPUs in 25 ms, it will be frozen by the system for the remaining 75 ms until the next quota period. Staging databases run in Kubernetes with small limits exemplify this behavior: under load, queries that would normally take 5 ms plummet to 100 ms. If the response graphs show load continuously increasing and then latency spiking, you’ve likely encountered this nuance. Address resource management—give more resources to replicas or increase the number of replicas to reduce load on each one.
Leverage Kubernetes ConfigMaps, Secrets, and Environment Variables
Kubernetes has several objects that can greatly simplify life for developers. Study them to save yourself time in the future.
ConfigMaps are Kubernetes objects used to store non-confidential data as key-value pairs. Pods can use them as environment variables or as configuration files in volumes. For example, you’re developing an application that can run locally (for direct development) and, say, in the cloud. You create an environment variable for your app—e.g., DATABASE_HOST—which the app will use to connect to the database. You set this variable locally to localhost. But when running the app in the cloud, you need to specify a different value—say, the hostname of an external database.
Environment variables allow using the same Docker image for both local use and cloud deployment. No need to rebuild the image for each individual parameter. Since the parameter is dynamic and can change, you can specify it via an environment variable.
The same applies to application config files. These files store certain settings for the app to function correctly. Usually, when building a Docker image, you specify a default config or a config file to load into Docker. Different environments (dev, prod, test, etc.) require different settings that sometimes need to be changed, for testing, for example.
Instead of building separate Docker images for each environment and config, you can mount config files into Docker when starting the pod. The app will then pick up the specified configuration files, and you’ll use one Docker image for the pods.
Typically, iftheconfig files are large,youuse a Volume to mount them into Docker as files. If the config files contain short values, environment variables are more convenient. It all depends on yourapplication’s requirements.
Another useful Kubernetes abstraction is Secrets. Secrets are similar to ConfigMaps but are meant for storing confidential data—passwords, tokens, keys, etc. Using Secrets means you don’t need to include secret data in your application code. They can be created independently of the pods that use them, reducing the risk of data exposure. Secrets can be used as files in volumes mounted in one or multiple pod containers. They can also serve as environment variables for containers.
Disclaimer: In this point, we’re only describing out-of-the-box Kubernetes functionality. We’re not covering more specialized solutions for working with secrets, such as Vault.
Knowing about these Kubernetes features, a developer won’t need to rebuild the entire container if something changes in the prepared configuration, for example, a password change.
Ensure Graceful Container Shutdown with SIGTERM
Why?
There are situations where Kubernetes “kills” an application before it has a chance to release resources. This is not an ideal scenario. It’s better if the application can respond to incoming requests without accepting new ones, complete a transaction, or save data to a database before shutting down.
What to Do
A successful practice here is for the application to handle the SIGTERM signal. When a container is being terminated, the PID 1 process first receives the SIGTERM signal, and then the application is given some time for graceful termination (the default is 30 seconds). Subsequently, if the container has not terminated itself, it receives SIGKILL—the forced termination signal. The application should not continue accepting connections after receiving SIGTERM.
Many frameworks (e.g., Django) can handle this out of the box. Your application may already handle SIGTERM appropriately. Ensure that this is the case.
Here are a few more important points:
The Application Should Not Depend on Which Pod a Request Goes To
When moving an application to Kubernetes, we expectedly encounter auto-scaling—you may have migrated for this very reason. Depending on the load, the orchestrator adds or removes application replicas. The application mustn’t depend on which pod a client request goes to, for example, static pods. Either the state needs to be synchronized to provide an identical response from any pod, or your backend should be able to work across multiple replicas without corrupting data.
Your Application Should Be Behind a Reverse Proxy and Serve Links Over HTTPS
Kubernetes has the Ingress entity, which essentially provides a reverse proxy for the application, typically an nginx with cluster automation. For the application, it’s enough to work over HTTP and understand that the external link will be over HTTPS. Remember that in Kubernetes, the application is behind a reverse proxy, not directly exposed to the internet, and links should be served over HTTPS. When the application returns an HTTP link, Ingress rewrites it to HTTPS, which can lead to looping and a redirect error. Usually, you can avoid such a conflict by simply toggling a parameter in the library you’re using, checking that the application is behind a reverse proxy. But if you’re writing an application from scratch, it’s important to remember how Ingress works as a reverse proxy.
Leave SSL Certificate Management to Kubernetes
Developers don’t need to think about how to “hook up” certificate addition in Kubernetes. Reinventing the wheel here is unnecessary and even harmful. For this, a separate service is typically used in the orchestrator — cert-manager, which can be additionally installed. The Ingress Controller in Kubernetes allows using SSL certificates for TLS traffic termination. You can use both Let’s Encrypt and pre-issued certificates. If needed, you can create a special secret for storing issued SSL certificates.
See how we can help to overcome your challenges